Map Drawing Process
Drawing these maps is a pretty time consuming process, and I figured some people might be curious how I actually go about drawing them. The process has evolved a bit since the start of this process but I will take you through all the steps I went through.
Step 1: Drawing Roughs
I load into missions on minimal difficulty and start creating sketches. There is no measurement system I use, it's all eyeballing. Once a basic sketch is done I will run the mission again with a few friends so we can confirm it all looks approximately correct before I move onto the next step.
This part is incredibly time consuming because enemies keep spawning, even on minimal. In the earlier days when I was using this method I'd get around 20 extremis enemies per sketching run. They weren't hard to deal with, but they were a nuisance.
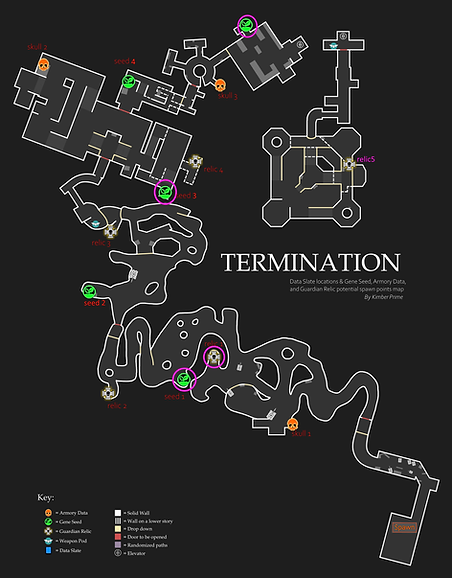
This image is Termination's rough, and one of the cleaner ones since I'd had more practice by the time I got onto this operation.


Step 2: Cleanup
With the rough now done I load the mission up again in case I need to double check any locations and get to cleaning up the lines.
I add in the drop downs, locked doors, and all the other details at this step once the main lines are done.
In response to feedback I also darkened the background to make it more clear where you would be walking vs what is out of bounds.
Step 3: Icons
I do this on the website version first since it's much easier to edit there, but I go through and mark the spawns of every item that I know that I want to be visible on the map. If I find a new spawn somewhere, it gets added to the map.
Some members from my own discord community as well as from a Blood Angel themed discord server helped out with this since it's much easier to find all the spawns with more people.
Since spawns have changed since launch we didn't mark anything down as a definite unless we actually found the item on a run.
If we had a screenshot of the item we'd just mark the location with a suitable icon and label it, if it was missing a screenshot we'd circle it (this later turned into a purple star as the indiciator)

Step 4: Screenshots
Since I was going to be posting these online I knew from early on that I wanted to make an interactive version, so by clicking on each icon the user would get a bit more information on where exactly the item could be found.
We collected these screenshots throughout the drawing process, and then used the purple star markings within a discord group chat to hunt down the missing ones.
Step 5: Finished
After we'd collected screenshots for all the items I'd link them to their icons online, make a plain image version of the map for people to download, and the operation would be complete.
There's always a chance we missed spawns, so if you encounter one that was missed do let me know and I will make sure to add it to the website (you can find my community Discord in the 'about' tab).
Extra: Special thanks to the modders
After drawing a bunch of the maps by hand the modding scene started to expand, and as part of that the Astartes Overhaul crew was kind enough to remove the camera range limit on photo mode. This meant I could fly around, not having to worry about enemy spawns, making my job a ton easier.